 Premiere® Pro Marker Export Plug-In version 1.2.1.10 Premiere® Pro Marker Export Plug-In version 1.2.1.10
Use this plug-in to export sequence and DVD marker information
from your Premiere Pro projects.
Download the product from the Downloads page.
Contents of this Document
Supported Versions of Premiere Pro
Installing and Uninstalling
Using the Plug-In Manager
Using the Plug-In
Updates
Support
Legal Notices
Supported Versions of Premiere Pro
Only Premiere Pro versions 1.5, 2.0 and CS3 are supported.
I have received feedback that it works with Premiere Elements 7.0,
but I have no way to verify this.
Installing and Uninstalling
The product is installed from the single file called "MarkerExport.1.2.1.10.msi"
and requires the Windows
Installer freely available from Microsoft.
The install routine does not make the plug-in available to Premiere Pro. After
installation, use the included Plug-In Manager to add the plug-in to the various
versions of Premiere Pro on your computer.
Before uninstalling the product, use the included Plug-In Manager to remove
the plug-in from the various versions of Premiere Pro, then use the Windows
Control Panel to uninstall the product.
Using the Plug-In Manager
Start the Plug-In Manager from the Windows Start menu.
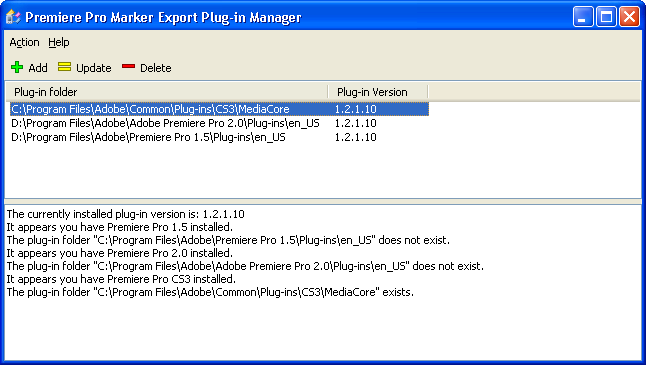
Upon start-up the bottom part of the Plug-In manager window will show what
supported versions of Premiere Pro have been found in the Windows Registry,
along with the default location of each version's plug-ins folder.
The top part of the window lists folders into which you have previously copied
the plug-in. It will be empty the first time you use the program.
To copy the plug-in to a new folder, click on the "Add"
button. If the plug-ins are in the expected folder then you can
choose the folder from the drop-down list, otherwise click the "Browse"
button to navigate to the correct plug-in folder. To find the required
plug-in folder, search all of your hard drives using the "compiler*.prm"
wildcard.
Using the Plug-In
Once you have used the Plug-In Manager to make the plug-in available to Premier
Pro you can click on a sequence in the Project Panel or Timeline
Window then click on the "File → Export → Export
Markers" menu item.
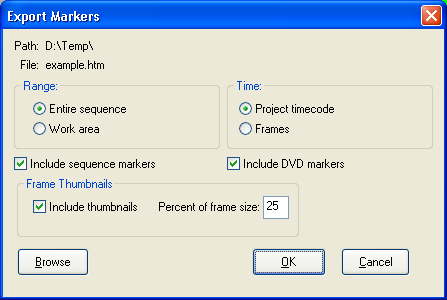
Choose the options as desired and click the "OK" button
to perform the export.
By default the export file will be in the same location as the
project and will have the same name as the project with an additional
".htm" extension. The export format is basic HTML which
can be opened in a word processor or spreadsheet and manipulated
further as desired.
Thumbnails are 24bit Windows bitmaps. There is no choice of format.
Support
Feel free to post questions in the Adobe
Premiere Pro Forum, the author of the program will respond there.
Legal Notices
This product is copyright © 2006-2009 2Writers.com. All Rights Reserved.
Adobe and Adobe Premiere are either registered trademarks or trademarks of
Adobe Systems Incorporated in the United States and/or other countries. |


